
Metal Roof Replacement Process: What Happens From Strip-Off to Finish
Metal roof replacement is one of those projects that looks simple from the street, then reveals a lot of moving parts once the old sheets come off. The best outcomes usually come from good sequencing: protect the home early, fix what’s underneath, then rebuild the water-shedding details properly so the new roof performs for decades.
When people research metal roof replacement sydney, most want a clear picture of what the crew actually does each day, what gets replaced versus reused, and where weather-proofing and leak prevention really happen.
Step 1: Pre-start inspection and site setup
Before any sheets are removed, a good team confirms scope and sets up for safety and access.
Typical pre-start items:
- Confirm roof pitch, sheet profile, penetrations, skylights, valleys, and chimney details
- Identify damaged areas, sagging battens, or signs of rot around eaves and valleys
- Plan safe access (scaffolding, edge protection, ladder points)
- Protect gardens, HVAC units, and entry areas with drop sheets or debris barriers
- Set a waste plan: skip placement, loading route, and tidy-down routines
This stage is also where the crew decides how to stage the strip-off to avoid exposing too much roof area at once.
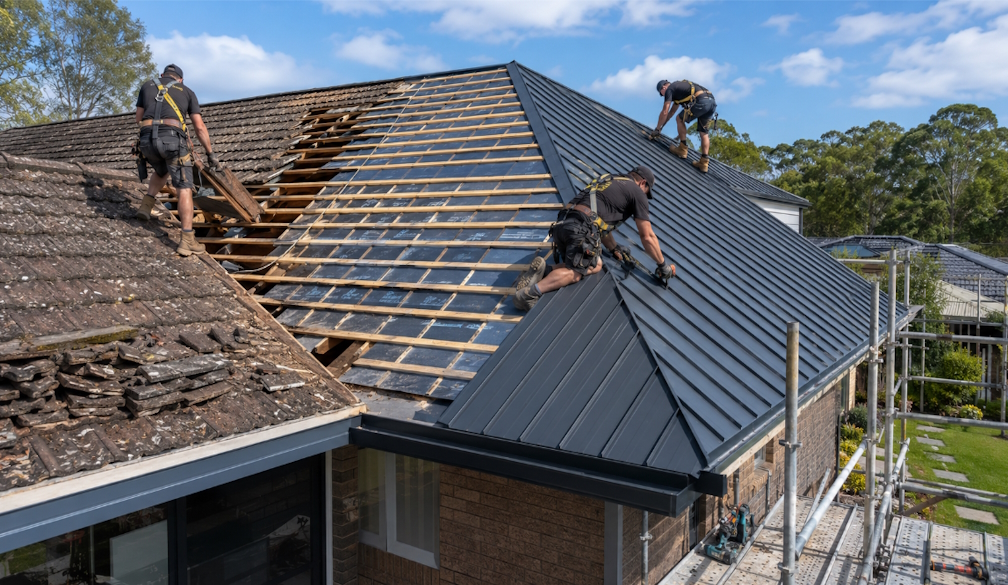
Step 2: Strip-off of existing roof materials
“Strip-off” means removing the old roof sheeting and often the old flashings and fasteners as well.
What usually comes off:
- Metal roof sheets (and ridge capping)
- Old fasteners and any degraded washers
- Flashings that won’t suit the new roof layout or are nearing end of life
- Any brittle sealants and patchwork repairs that were masking underlying issues
In many projects, strip-off is done in sections so the roof is never left widely open.
Step 3: Assess and repair the roof structure
Once the roof is exposed, it’s easier to see problems that weren’t obvious from inside the house.
Common checks and fixes:
- Replace rotted fascia boards or damaged timber at eaves
- Repair or replace sagging battens
- Check trusses/rafters for water damage around long-term leak points
- Confirm roof line straightness and fix local dips that would affect drainage
This stage matters because a new metal roof can still leak or look uneven if the base structure is compromised.
Step 4: Install or upgrade sarking and insulation layers
Sarking is a layer that helps manage moisture and can improve weather tightness. Depending on the home and roof design, this step may also include insulation upgrades.
What can be involved:
- Installing reflective foil sarking or breathable membrane (as specified)
- Ensuring overlaps are correct and taped/sealed where required
- Detailing around penetrations so water is directed outward
- Upgrading insulation where accessible and practical
This is also where condensation control is often improved, especially for older roofs that never had modern moisture management layers.
Step 5: Battens and fixing points
Metal roof sheets need correct fixing points. Even if battens exist, they may not be in the right condition or spacing for the new roof profile.
What happens here:
- Install new battens or adjust spacing to match manufacturer requirements
- Confirm alignment so sheets run straight and fixings land correctly
- Prepare edges and eaves so flashings seat properly
This is one of the biggest “quality tells” in a finished roof, because poor batten alignment shows up as wavy lines and inconsistent fastener runs.
Step 6: Flashings, valleys, and water-shedding details
Most persistent roof leaks start at the details, not the big flat sheet areas. Good replacement work treats flashings as core structure, not an add-on.
Common elements installed or replaced:
- Valleys (especially where two roof planes meet)
- Apron and step flashings at walls or chimneys
- Barge flashings at gable edges
- Gutters and fascia interface details
- Penetration flashings for vents, flues, skylights, and antenna points
A quality build focuses on overlaps, direction of fall, and mechanical fixing rather than relying on sealant as the main defence.
Step 7: Install new metal roof sheets
With the base prepared, the new sheets go on in a set sequence.
Typical installation steps:
- Start from a reference edge to keep everything square
- Lay sheets with correct side laps and end laps (if any)
- Fix with appropriate screws and washers, tightened correctly
- Check alignment as rows progress to prevent drift
- Add ridge capping and closures as required for weather and pest control
Fastener placement and torque matter. Over-tightening can damage washers and under-tightening can lead to movement and leaks.
Step 8: Final sealing, clean-up, and inspection
The finishing stage is where long-term durability is protected. Metal roofs can be damaged by leftover swarf (metal filings) if it’s not removed.
Final tasks often include:
- Remove swarf and debris from the roof and gutters
- Check all flashings and penetrations for fit and fixing
- Confirm ridge and barge caps are secure and aligned
- Water test or visual flow check where practical
- Clean the site thoroughly, including magnet sweep for stray screws
- Provide any warranty documents and maintenance notes
A well-finished roof should look uniform, drain cleanly, and have neat, consistent lines at ridges, edges, and around penetrations.
What can change the timeline?
A replacement can move quickly on simple roofs, but timelines expand when there are complications like:
- Hidden timber damage requiring repairs
- Complex roof geometry with many valleys or penetrations
- Weather interruptions
- Coordinating gutters, fascia, or skylight work at the same time
The most important takeaway is that the “middle steps” matter as much as the final sheets. The roof’s performance is built into structure, membranes, battens, and detailing, not just the metal you can see from the street.